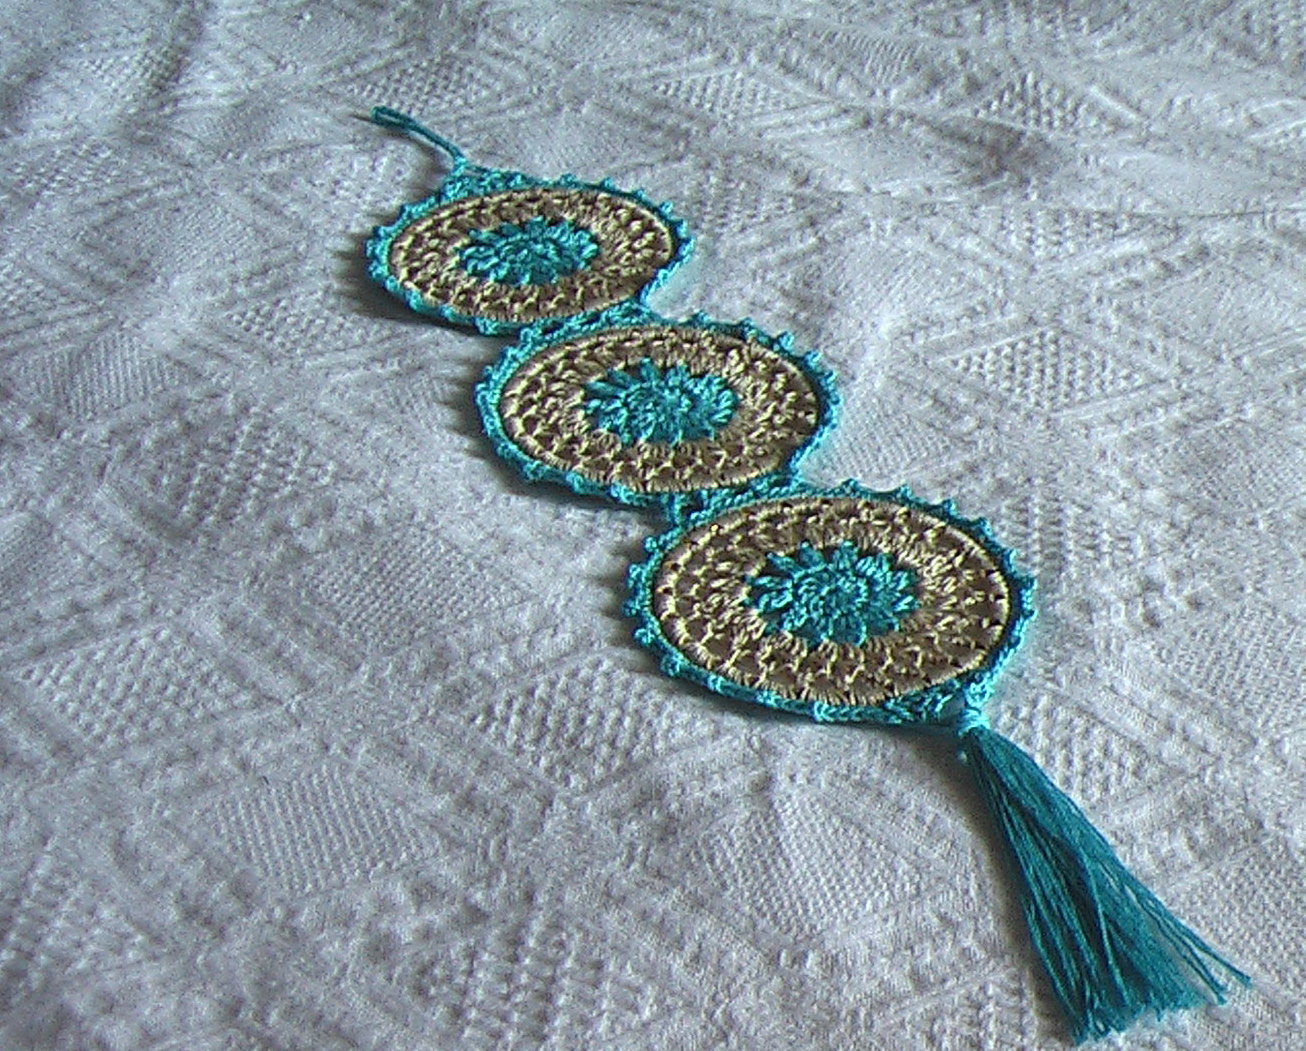
Showing posts with label tutorial. Show all posts

Saturday, August 4, 2012

small crochet


I've been crocheting with a 1.5 mm hook for a lifetime (it seems). I will persevere and see this project to the end in sha Allah! Then, I will grab a hook in the range of 4 to 6 mm and crochet with a skip and a jump! I may pick up one of the two blankets I'd started on. I might even hook up a Ribbon Accent bag


Or even knit something like this Amari shawl!

It makes me ponder a little more about the issue of making money out of a hobby. Do you still enjoy what you do once you have looming deadlines over your head and customers negotiating prices? If you do sell your handmade goods, is it better to make and sell (for example, on Etsy) than to take orders for customised items? What's your take on this? 


Speaking of the smaller hook size, remember the bangle motif? Elena over at ArtEC has just made a video tutorial for it (she has made it in to earrings though, which is great!) ... in Italian! Isn't that just ... bellissimo?

Read more...

Tuesday, January 17, 2012

lessons in crochet

Sometimes I think you don't know me. 
You don't understand me. 
We're so different. 
You'll never really "get" me. 
But when you go traipsing around town, 
searching high and low, 
just so I can finish this 


no matter how crazy it might seem to you,
 I know you care about how I feel 
and 
I know 
you know me. 
Allah yahfadhak.


I tweaked a shrug pattern. And you can too! I used a different yarn, hence completely different sized hook and kept trying it on until I had it how I wanted it. 

This is the pattern I used, but there are lots on Ravelry.

Following the pattern, I worked up a rectangle.


As you can see, I used a chainless foundation because ... it's brilliant!


I continued with the pattern but making sure that I had the right multiple of stitches along the side.


I had an inkling that I wouldn't have enough of the cotton-viscose mix I was using and "decided" that I didn't want long sleeves. You could always add increases and have your sleeves flare out a bit.


For the collar, back and front, I carried on with the pattern. I didn't stick to the number of rounds given in the pattern that I used. I kept trying on the shrug to check!

Lessons learnt:
  • Don't be afraid to do it your way.
  • You might find the yarn you need (in the teeny tiny stationery shops of Jeddah) where you don't expect to.
  • If it's old stock, check that they have enough BEFORE you start working on your project, because they're not likely to order more in from France or Turkey or wherever they got it from!
  • If you're making a garment for a particular event, start well in advance so you don't have to deal with last minute, panic-inducing hitches!
  • ALWAYS appreciate the special people around you!  

Read more...

Sunday, October 2, 2011

bangle motif tutorial

I've had trouble getting online. Thanks Mobily!


Finally, here's the tutorial for the bangle motif for Aysh and anyone else who might be interested. Of course there's a lot you can do with the basic bangle motif. I attached three to each other to make the wall hanging.


But I think it would look cool as a necklace or even earrings. So if you do crochet some, do let me know and leave a link. I'd love to see!

I used thrifted bangles, a 2 mm hook and some crochet cotton.  


I started with a magic loop. I think this little technique is great for motifs where you really don't want a little (or even big) hole in the middle. It took me a while to get it though!


Magic loop


Pull up a loop from the long end of the thread.


Then yarn over (yo) and pull up another one to secure it.


Then work a double crochet (dc).


And 11 more, working over the short end of the thread. 


When you have 12 dc, pull the short end of the thread. This is the "magic" bit.


Give it a good tug.


Then, slip stitch into the first dc.


No gaping hole in the middle!


Now for the rest of the pattern ...


Chain 2, [yo and pull up a loop in the same stitch, yo, pull through one loop] twice, yo, pull through all the loops on the hook.


Ch3, yo and pull up a loop in the next dc, yo, pull through one loop, [yo and pull up a loop in the same stitch, yo, pull through one loop] twice, yo, pull through all the loops on the hook. Continue working these cluster stitches in every dc around, with 3ch in between.


Join another colour if you like, and this time, you carry on with same stitches but you work 2 clusters in to each of the ch3 spaces.


My motif was a little bit smaller than the bangle at this point, so it was time to incorporate that bangle in to the pattern. Of course you can go bigger or smaller if you like but the motif shouldn't be the same size or bigger than the bangle that you're using. You want it to pull taut on the bangle. Start by pulling the long, working yarn through the bangle (to the back). 


Ch1 and work 4 single crochets (sc) into the 3ch space from the previous round and the bangle too. 


Keep working 4sc into each 3ch sp and around the bangle at the same time.


When you've finished working the round slip stitch in to the first sc. The sc in to each sc. I added a ch3 between every second and third sc in a 4sc group.


Any questions? Just let me know. And remember, I'd love to see what you make with the pattern.


Read more...

  © Blogger template AutumnFall by Ourblogtemplates.com 2008

Back to TOP